


Remember that I moved... If you haven't changed your reader yet be sure to go visit the new site and change that so you don't miss anything!
There's a new free download over there as well for you on the New Schlosser Designs Blog


Remember that I moved... If you haven't changed your reader yet be sure to go visit the new site and change that so you don't miss anything!
There's a new free download over there as well for you on the New Schlosser Designs Blog
Yes, I've already moved to the Chicago area, but I've now moved my blog and redesigned the store! Be sure to update your feed and bookmarks! I will post on this one for about a week or two longer and then all new posts will be solely on the new blog! Not only did the blog get moved, but it's also been redesigned and is SO much easier for you to find your favorite projects and downloads! All you have to do is go to the top and click on the project gallery!
Here's the new site: www.schlosserdesigns.com/blog Easy, right! Come by for a visit and let me know what you think! I don't want to miss anyone!
For those who have subscribed through email from Feedburner, that's already been updated so you don't need to sign up again!
I'm done moving and now call Evanston home. Although I'm sad to leave Texas I'm excited about all the new possibilities and adventures the Chicago area will provide! (And if any of my readers have some great craft stores to share with me please do!!)
I'm switching my store and blog to a server that can handle all the downloads that I've had! I hate for you to visit and have a project not available for you to download immediately! Bear with me about one more week and I'll be done with my late Spring Cleaning and have a new blog, store, and projects to share with you!!!
If you need anything immediately from the store please email me at erinschlosser (at) schlosserdesigns (dot) com!
See you soon!
I probably should have titled this post something like What I'm doing instead of packing for the move in 4 days, or maybe What I'm doing now is way more fun than packing, but since it's Tuesday, a tutorial it is! This is a new project template that can be used in conjunction with the storage tins used for the Classy Dad Kit and the Tool Kit.
 This free template has two options for you!
 Here are the main items assembled to put together the kit. The free PDF template (see below for the download link), silver tin, a few coordinating papers, and don't forget the chocolate Riesens! Just cut out the pieces you'd like to use and you're ready to go!
 This is my favorite part! If you use the pocket and handkerchief pieces don't forget to write a little note on the handkerchief to put in the pocket!
 Wrap the Riesens in strips of paper for a fun treat inside!
Ready? The winner of the Classy Dad Kit, Tool Project Kit, and 2 tins to make both projects is:
Congratulations! Trenda P. that's you! I'll be in touch shortly!
Thanks everyone for all the suggestions! There were some great ones and I can't wait to get started on some new designs!
Remember, if you didn't win you can still purchase the items in time to receive the tins well before Father's Day and use the coupon code MOVE09 to get 20% off your order! It's only good through the end of this week as the big move day is next Saturday!
Here's the kit for those DIY dads! I had lots of fun with this kit! There's lots of little tool icons and the wood texture was fun to work with also. As with the release yesterday there's a standard version and a custom version which lets you type in all your own sentiments. All you need is candy, tins, and the kit! The both kits include two cards, the tin cover with three alternate sentiments, and one sheet of designed labels. You don't need any special photo editing software to add the text either if you purchase the custom one! I tried to make it super easy for you!

 The labels are standard Avery 8160 series address labels. I printed the cards and tin front on shiny photo paper which looks really nice and professional in person!
Don't forget to enter the giveaway! See the post here for the details!
Woo Hoo! I'm so excited for this new project release! You remember the fun Valentine's Day Tin project? Well how about a Father's Day one? This 3 page PDF includes two cards, one tin cover with 3 alternate sentiments, and a full page of labels. I also found that the labels will go well over Reisen's as well as Hershey's Nuggets! All for only $3! (Don't forget to use the coupon code MOVE09 to get an extra 20% off!) The only thing the kit doesn't include are the tins which are available here. (The coupon code is good for those too!)
Lots of you requested a way to add or change the sentiments so I've made an extra special PDF for you! This PDF is exactly the same as the $3 one, but has text boxes in place of the sentiments so you can add whatever you'd like it to say! This kit is only $5 in the shop! You can print and change the text as much as you'd like! All you need is Adobe Reader. No other special software is required to type in the text.
This would be a great kit to buy if you'd like to use it for a birthday or thank you gift as well!


What if you're dad isn't and argyle and herringbone type of guy? Here's a sneak peek of another kit which will be released tomorrow for the handy dad!
And how about this? We'll do a giveaway because I LOVE doing giveaways! Here's what you'll win! You'll get the Custom Classy Dad Kit, and the Custom Tool Project Tin (tomorrow's release) and I'll send you two tins to make some with! That's almost $20 worth of product!
How do you enter? Leave a comment below letting me know what other types of kits you'd like to see me create. How easy is that?
Want more entries? Do any combination of the following to get extra chances to win:
1. Blog about the giveaway on your blog. (Leave me a separate comment with your blog post.)
2. Share it on Facebook with your crafty friends. (Leave a separate comment telling me you did so.)
3. Tweet it. (be sure to add @eschlosser to your tweet so I see it!)
4. Talk about it in your favorite crafty forum. (Leave a comment telling me you talked about it.)
If you leave me a comment, and do all of the above you can get up to 5 entries!
I'll pick two winners Saturday so be sure to enter by Midnight, Friday June 5th.
Happy Crafting!
Here's a quick hexagon box template that was well loved last year:
1. Download template here. Find a wood grain image online that you like. I like to look at Wilsonart Laminates , or Treefrog Veneers. Once you find an image that you like, right click on the image and save it to your computer.
2. Print the wood grain image on photo paper or cardstock, then print the templates onto the wood grain. (Any other pattern will work too!)
3. Then follow the directions on the template to finish up! If you'd like to do the graduated sizes like shown above, just print at different percentages. Try 85%, 100%, and 120%.
Stay tuned this week for another Father's Day Wood themed downloadable gift set!
Happy Crafting!
I found some copper wire as I was cleaning out my garage to prepare for my move and got sidetracked in making some little garden decorations! (Because crafting is WAY better than packing!) These would make great Father's Day Gifts for those fathers that like gardening! Best thing is: They are super easy to make! Both of these took me about 15 minutes total!
You can get various diameters of copper wire by the foot at Lowe's or Home Depot. Find a diameter that is easy enough to bend, but not flimsy. Bend them into shapes and leave about 12" of straight wire at the bottom so you have something to stick into the ground.
I find that it's easier to make the shape and then cut, instead of cutting a straight piece of wire and then bending it into the shape you want. If you're having trouble with shapes, try sketching a shape on a piece of paper and bending the wire into that shape.
Happy Crafting!
Don't forget about the moving sale! Just enter in the code: MOVE09 for 20% off of everything in the Schlosser Designs Store!
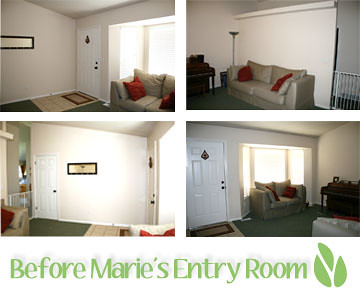
Over at Fresh Nest Design we've helped Marie from Make and Takes redesign her space!
Thanks everyone for checking in today! I'm glad you did-because I've got a moving sale! Since my new place is up 3 flights of stairs with no elevator my husband has declared that my current inventory needs to be minimized!
Be sure to order now before the current inventory is gone! Here's the store: Schlosser Designs
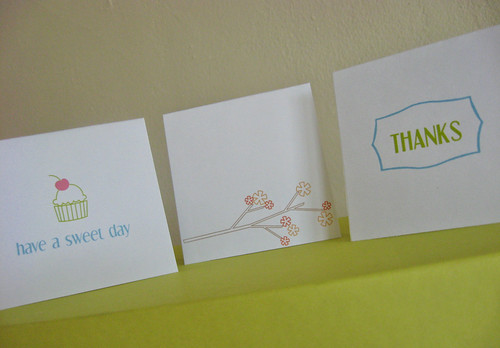
Thank you so much to all my testers! I made a few changes based on the feedback I got from you and here's the final product! Download the PDF here. There are two cards on the sheet. Just print on 1 sheet of white cardstock, cut in half, embellish, and you're done!
But wait, you might ask why I had some testers test this project out first. It's because the sentiment on the front of the card can be whatever YOU want it to be! (Look for more projects with this feature shortly!) When the PDF opens up, click on the sentiment where it says Type Custom Sentiment Here and type away to your hearts content. These cards will allow you two lines in which to type a custom sentiment for your mom! How awesome is that?
Happy Tuesday Everyone!
Edited: Thanks Daniel for letting me know about the bandwidth! It is a pretty popular download. The location has now been moved and is ready for downloading again. I'm working on moving the rest of my projects over so as soon as they are moved I'll let everyone know. Thanks for your understanding!
Hello everyone! Well I'm back from our quick trip to Chicago and thanks to the airplane ride I have another project to share with everyone! But before I do that I'd like a few people to test it first! (It has some new features with the PDF!) So... if you'd like to get the project (It's a Mother's Day Card) before everyone else and help me test out the new feature email me at:
erinschlosser (at) schlosserdesigns (dot) com
and put Mother's Day Test in the subject line please! I'll need about 5 people so email me quick! But don't worry, I'll release it in the next few days for everyone to download!!
And since I don't like doing posts without pictures, check out this wonderfully colorful display I took while in Chicago! Edited: Thanks for the emails! I've gotten enough people to help test for now! Look for the new project soon!
This is one of my favorite projects that I've used a few times this week already!
Ribbon Bordered Picture Frame.
 | |||||
I was just introduced to this site yesterday and thought I'd share. It's called CraftFail and it's where crafters submit projects that didn't necessarily turn out as planned. (Go visit and have a look around!) Because we ALL know that happens! I've got so many projects that I've done for the blog that didn't turn out like I planned and decided not to include here. Maybe I should feature some of them here? So, don't worry if you're new to crafting or trying a new technique! Many times I do 3-4 ideas before one I like enough to feature here. Have any projects that didn't turn out like you wanted? Please share in the comments!
Here's a slide show of the book I made for a co-worker that was expecting. (Katelyn has been born now!)
It's super easy to make! And here's the download for you! Click to download the Baby Book. There's 4 pages in PDF format. (Each page has 3 prompts.) All of the scrapbook prompts above are included and I added some that include meeting their sister/brother/siblings and the cat. I also added a stat page for a boy too. So you're ready to go!
When I made it I put one prompt on each page (each prompt is the size of an index card) and left space on the other side for a picture. That way the book is already made, the new parents just fill in their thoughts and add a picture!
Let me know in the comments if there are other pages you'd like to see and I can make those a separate download!
Happy Crafting!
Adobe likes me again so be sure to go to this post and get your Just Because candy wrappers download!
For some reason Adobe doesn't want to make PDF's for me right now...so while I figure it out tonight and have the download ready to go for you tomorrow (scroll down, Adobe likes me again and the links are up!), here's a sneak peek of the project: Tomorrow I'll have the bag topper and candy wrapper labels for your downloading pleasure!
Edited:
Ok, download the two PDF's and you're good to go! I wrapped the labels around Hershey's Nuggets so all you'll need is a bag of those and you're ready! The instructions for the bag toppers are in the download and I just added a simple silver rhinestone for something extra.
Here's the links! Click to download the PDF's.
Candy Cover Labels
Candy Bag Toppers
**Be sure that when you print them they are not scaled or fitting to page. This will cause them to not print correctly! For the labels I used the Avery 8860 white address labels. (They are 1" x 2 5/8")
Let me know if you've got any questions or comments!
Happy Crafting!
Many of you know I'm an interior designer on top of all the crafty fun I have here. So on top of finalizing the new stamp set releases (yea!) I've co-founded an interior design specific blog with Deb from Mumbo Jumbo! I've always believed that no matter what your budget you can have well designed spaces! So head on over to Fresh Nest Design for inspiration! And don't forget to follow the instructions in this post to win a spot for our Monday feature: Redesign a Space where we choose reader submitted spaces and give them a makeover! You can also submit questions or tips. Who knows? We might answer your questions too!
(Don't worry, this blog is not going to go by the wayside! In fact, due to my new employment situation I hope to post more craft projects every week here!)
Thanks for your continued support and wonderful comments and emails I receive! I can't wait to start going through my 3 sketchbooks and creating new projects to share!
Have an awesome weekend!
These were super simple to do! I used the stamps from the Have A Tweet Day stamp set. These are cotton napkins I found for $1 a piece at Garden Ridge. Just pull out your ink and stamp directly onto the napkins! It's easy using the clear stamps because you can see exactly where the image is going, and you can make sure that you have ink covering the entire image before you stamp. Use a permanent ink like Stewart Superior's Hybrid ink. Heat set it with your iron without using steam and you're ready to go for a wonderful Easter brunch!
 I love the little bird feet border on this one!
 And a little nest garland with occasional eggs!
 Happy Crafting!
How about 4 sets of my clear stamps, and the clear blocks to mount them on? (Including the yet to be released new sets!) I am so excited to announce that I'll be sponsoring the prize next month for Christy's Craft Challenge! She has the most amazing crafts, written tutorials, and videos! Check out one of my favorite projects:


Here's a quick Happy Spring Card I did this weekend in honor of the 1st day of Spring. This would also make a great Easter themed card! I used my Have A Tweet Day clear stamp set for this one. I LOVE the little nest stamp. If you look at the stamp set you'll see a little "bundle" of sticks. With this, you can make your nest as big or as small as you'd like. Just stamp it multiple times in an oval shape to get your nest! Or if you want a border, just stamp it around in the shape of a circle or square. (It's super easy to do because your stamp and the mounting block are clear so you can see right through everything to line it all up!) I stamped the eggs on white cardstock, cut out, and layered with different thicknesses of foam tape. (Don't forget that you can stack two layers of foam tape to get even more dimension than just one layer. Here I adhered one egg directly to the nest, put 1 layer of foam tape on one, and 2 layers of foam tape on the one in the middle for added dimension.)
After you've stamped the main image, just put a border of velvet rickrack around it and secure the corners with brads.
Happy Crafting!


